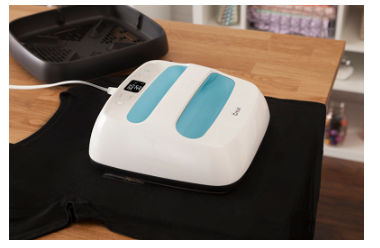
How To Setup Cricut EasyPress Machine?
- Posted by:Drake shawn
- Tags:Setup Cricut EasyPress Machine, Cricut EasyPress Machine, Cricut Machine
You have opened up your Cricut EasyPress machine box and plugged it in. Now, it is time to set it up. You should have proper knowledge about the machine setup process. Else, you can ruin your project. Whether it is an iron-on project or any other, correct steps are required to complete the project successfully without any issues. This blog will provide you the complete instructions on how to set up your Cricut machine. It will also teach you the correct steps to use it, setting the right time and temperature. Read the below-required instructions to know more about the complete setup process.
Step1: Unboxing Cricut EasyPress Machine
When you open your package, you will find the following items in the box:
- Cricut Easy Press Machine
- A Safety Base
- Sample Practise Materials
- User-Manual Guide Booklet ( you can use this as a reference for setting time and temperature in your Cricut EasyPress machine. The different types of materials need different values of both time and temperature. You can also refer to the Cricut Heat Guide for the same.)
- A Welcome Card
- A Warranty Card
Step2: Set The Temperature On Your EasyPress
- To set the temperature, press the “TEMP” button on your Cricut EasyPress machine.
- To adjust the value of the temperature, use the plus (+) and minus (-) buttons. The plus button will increase the temperature, and the minus button will decrease the temperature.
- To switch the temperature settings from Celsius to Fahrenheit. Press and hold the temperature button on your Easy Press machine.
Step3: Set Time On Your Cricut EasyPress Machine
- Press the “TIMER” button on your Cricut EasyPress machine to set the time.
- You can adjust the value of time that you have entered with the plus (+) and the minus(-) buttons on your easypress machine.
Step4: What Does The Flashing Light Mean
- When you see the orange light flashing on your Cricut Easypress, it indicates that the machine is heating up.
- The green light on your Cricut Easypress machine indicates that it has reached the set temperature.
Step5: Start The Timer On Your Cricut EasyPress Machine
- To start pressing on your project and the countdown of the timer, just press the C button on your Cricut easy-press machine.
- When you hear a beep sound, it indicates that the time is up.

Important Points To Keep In Mind:
- Make sure you always use your Cricut EasyPress machine at room temperature.
- Make sure all the fabrics and other base materials are completely dry before using them on your Cricut EasyPress machine.
- When you are not using the Cricut EasyPress machine, ensure to keep it in its Safety Base.
- Make sure there are no tapes or protective film over the control panel of your Cricut Easy Press Machine before you start using it.
How To Setup Cricut EasyPress For Iron-On Projects?
Step1: Turn On Your Cricut EasyPress Machine
- Plug in your Cricut Easy Press machine into a wall socket. Then, turn on your machine by pressing the Power button.
- While using the EasyPress machine, make sure you choose a firm, flat, and heat-resistant surface. It is recommended that the surface that you use for pressing at least reaches upto the height of your waist.
- Make sure the surface is sturdy enough to press and completely avoid a flimsy iron board.
Step 2: Set The Timer On Your Cricut EasyPress
- You will find a pamphlet with every detail about the time and temperature settings required by every material you can use for your project. You can also refer to the Cricut Heat Guide to determine the project settings.
- First, press the “TIMER” button, and use the “+” or “-” buttons to set the recommended time.
Step 3: Set The Temperature On Your EasyPress Machine
- Press the “TEMP” button to set the temperature. Use the plus(+) or minus(-) buttons to set the recommended temperature.
- As soon as you see the orange light flashing, it means that the Easypress machine has reached the set temperature.
- When you see the green light flash on your Cricut EasyPress, it means that the machine has reached the set temperature.
- When you hear a beep sound, it means that the EasyPress machine is ready for use.
- Use your Cricut EasyPress machine with extreme caution, as it operates at high temperatures, which can cause injuries.
Step 4: Preheat The Base Material And Position Your Design Over It
- Place your Cricut Easy Press machine on the fabric that you are using for your project for the recommended time to preheat the base material.
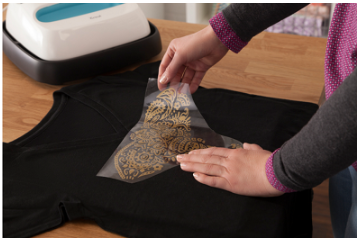
- Position the cut-out design over your base material, and place it where you want it to remain after pressing. Make sure that the clear carrier sheet, which is the shiny side, always faces up.
Step 5: Apply Heat
- Place your Cricut Easy Press machine over the base material, then press the “GO” button to start its timer.
- Hold the heat press machine in place, and apply the recommended pressure over it.
- You have to apply the heat on both sides for firm adhesion, so flip over the base material and heat the back side of your design for the recommended time.
Step 6: Remove And Reveal The Design
- Always peel off the clear carrier sheet after your design has reached the recommended peel temperature. To know that, you can refer to the Cricut Heat Guide. Then gently remove the clear sheet and reveal the design.

Step 7: Method To Layer Iron-On Design With Your Cricut EasyPress
- There might be a chance that the design that you want to press on your base material is designed with multiple layers that fit together to form a composite image.
- To press such designs, first, place the bottom layer of your design onto the base material. Then cover it with your Cricut Easypress machine, and apply firm pressure for one to three seconds.
- Place your Easypress machine back in its safety base. Then, remove the clear carrier sheet from the applied layer only when it is not hot but warm enough to touch. This method is also known as Warm Peel.
- Repeat the above two sub-steps for all the remaining layers except for the topmost layer of your design.
- When you apply the top layer to your design, apply firm pressure on it with your Cricut Easy Press machine for fifteen seconds.
- Lastly, flip over your base material and apply heat on the other side with firm pressure for ten to fifteen seconds.