How to Setup a Cricut Explore 3? [A Comprehensive Guide]
The Cricut Explore 3 is the latest die-cutting machine in the Cricut Explore Air suite of machines.
Based on the success of the Cricut Explore Air 2 a few years back, the Cricut Explore 3 is 2 times faster and cuts up to 12 feet at a time - it's a huge upgrade!
This great mid-level machine will suit most crafters from the ground up. In this guide, we delve into everything you need to know about this machine, including the Cricut Explore 3 setup, what materials it can cut, how it compares to its competitors, and so much more.
What is Cricut Explore Machine?
The Cricut Explore is a digital craft-cutting machine that looks like a printer. But instead of printing your designs onto paper, it uses a fine blade and a range of rollers to print everything you can imagine, like vinyl labels, decals for shirts, paper crafts, and so much more.

The Cricut Explore machine is unique as compared to the older Cricut models like Expression, Gypsy, etc. Cricut Access gives you access to their massive library of designs and pre-made craft projects in place of cartridges. You can upload and cut your own designs and projects. Cricut Design Space should be used on a desktop computer or mobile device. Over 100 different types of material can be cut using the Explore machine. Even writing, drawing, and scoring could be done on this machine.
The Cricut Explore machine has many applications outside of scrapbooking. If you enjoy DIY projects, party planning, or crafts, you'll love Cricut Explore.
What Material Can Cricut Explore 3 Cut?
With the Cricut Explore 3 machine, you can cut a wide variety of materials, including:
- Adhesive foil
- Aluminum foil
- Butcher paper
- Calibration paper
- Cardstock
- Chalkboard vinyl
- Construction paper
- Corrugated cardboard
- Craft foam
- Cutaway card + backer
- Deluxe paper
- Denim, bonded
- Faux leather
- Felt
- Foil iron-on
- Heavy cardstock
- Holographic iron-on
- Infusible ink transfer sheet
- Matboard
- Tattoo paper
- Wax paper
- Window cling
- Wrapping paper and more.
The Cricut Explore 3 cuts such a wide variety of materials that your imagination is the only limit. This machine can handle everything from delicate tissue paper to thicker leather.
How is Cricut Explore Air 2 Different From the Explore 3?
The major difference between the Cricut Explore 3 machine and its predecessor, the Cricut Explore Air 2, is that the Explore 3 machine can cut Smart Materials. Also, it includes a smart look and cuts faster than the Explore Air 2 machine using the Fast Mode feature. The Explore 3 machine is compatible with Cricut Roll Holder for Smart Material holding.

What is Cricut Design Space?
Cricut Design Space is free online software or app for your desktop computer and mobile device (Windows, Mac, iOS, and Android) that allows you to prepare your design for cutting and send it to the Cricut cutting machine. This software or app is free, but you can pay for the Cricut Access subscription plan, which gives you more photos and fonts.
With Design Space, you can create the design you want to cut, lay out your materials on the mat, check your settings, and start cutting!
How to Create a Cricut Design Space Account?
To use the Cricut machine, you must create an account with Cricut Design Space. This software is used to create and design files the machine can understand.
You can access your designs, craft projects, payment details, and connected cartridges by creating an account. Let us walk you through the process because it is simple too.
Step 1: Create a Cricut Account
- To create a Cricut Design Space account, visit "design.cricut.com/setup."
- Next, press the "Get Started" button at the bottom of the screen.
- To create your Cricut account. Type in your name and email, and select your country from the drop-down menu.
- Read and check the "Terms of Use," then check the box indicating that you’ve done so and accept them.
- Before submitting details, check the "Send me Cricut tutorials, inspiration, and deals via email" box.

- Cricut emails you about sales, new releases, sharing inspiration, etc. If you don't want to receive these emails, uncheck the box. If you're going to try it, leave the box checked.
- Once you have set all that, tap on "Create User ID." You will see confirmation mail that your account has been created, then hit "Continue."

- From the next window, Cricut asks a few questions to get to know you better.

- These easy questions help Cricut to know who its user base is. Choose the correct answer from the drop-down box.
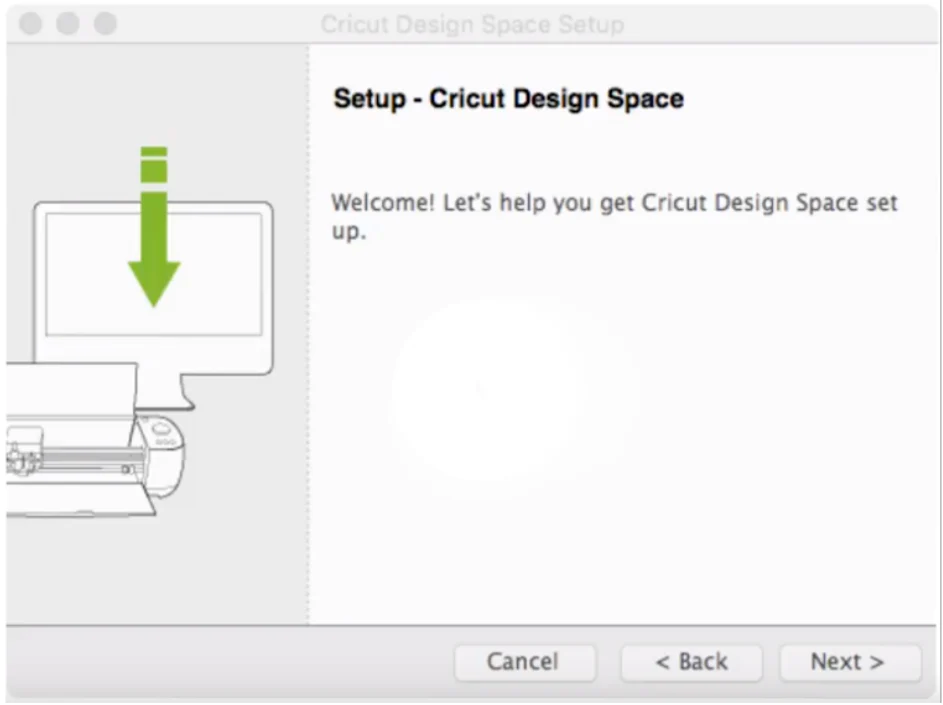
Step 2: Download and Install
- Now, install the Design Space plugin. You will use this software to design with the machine. Tap on the "Download" button.

- A setup wizard screen will appear and walk you through all the steps. Hit the "Next" button.
- Carefully read the "Terms of Use Agreement" and tick the box next to "I accept the Agreement."

- You will have to accept the terms of use in order to download.
- Press the "Install" button.

- After that, the Design Space software will install on your PC.
- The plugin will complete installation, and you will notice a confirmation window. Hit "Done."

- The final confirmation window will open, and tap the "Continue" button.

- You’re ready to start the Cricut cutting machine.
- Once connected, hit "Continue" on the bottom right side.
- Cricut will check to see if you need to update the firmware on the machine. Select "Continue."
- The next window will show, "Get your free gifts," and will let you activate your 14-day Cricut Access free trial plan. If you want to delay activating it until you know something else, skip it.
How to Login to the Design Space in Cricut?
Once you’ve created a Cricut account, we suggest that you log out of it and log in again. In this way, you can check for any issues with your account. Now, follow the steps in the section below:
- First, open an internet browser on your desktop computer.
- Then, enter the URL "design.cricut.com/setup" in the search bar.
- After that, you need to download and install the "Cricut Desing Space" software.
- Under the "Account Settings" icon, go to the "Account" tab and click on "Sign In."
- Next, type your registered email for your Cricut ID account.
- Now, input your password and click the "Sign In" button.
- If you’re new to the Desing Space software, select the “Create Cricut ID” option.
- From the next screen, enter the necessary information.
- After that, carefully read the Cricut software "Terms and Conditions."
- Return to the last screen and tick the box next to "I Agree the Cricut Terms of Use."
- Also, select the "Send me Emails (deals, tips & inspiration)" option.
- Now, you have to tap on the "Create Cricut ID" button again.
- Once the above steps are over, you will receive a message about completing the process.
- You can see that your account is logged in to your Cricut ID account via "design.cricut.com/setup."
- Finally, get started with your unique DIY projects quickly and easily.
How to Setup Cricut Explore Machine on Windows 10?
In order to setup the Cricut Explore machine on your Windows 10, do the following:
- To get started, plug in the Cricut Explore machine and turn it on.
- Then, connect the machine to your PC via a USB cable or Bluetooth.
- After that, open a web browser window on your PC.
- Next, enter the URL "design.cricut.com/setup" in the search bar.
- Now, download and install Cricut Design Space on your PC.
- Follow the steps on the screen to sign in with your Cricut account and set up the machine.

- Once the setup is complete, you can start creating your craft projects.
How to Setup Cricut Explore 3 on Windows 10?
Are you looking for Cricut Explore 3 setup on your Windows 10 system? If yes, then follow the basic steps below:
- First, plug in the Explore 3 machine and turn it on.
- Next, connect the machine to your system via wireless Bluetooth.
- Make sure the machine and your system are within 10 to 15 feet.
- Then, click on the "Start window" icon, and select the "Settings" icon.

- From the next screen, click on the "Devices" section.

- Confirm Bluetooth is turned on and tap "Add Bluetooth or other device."
- Click "Bluetooth" and wait for your system to locate the machine.

- After that, select the Cricut model from the given list.
- Now, the Cricut machine is paired with a wireless Bluetooth connection.
- In the end, return to Cricut Design Space and go to "New Product Setup."
- The Cricut machine will show "Connected" during setup.
Frequently Asked Questions (FAQs)
Question 1: How to Use a Cricut Explore 3 Machine?
Answer: To use the Cricut Explore 3, you must first unbox the package. Then, check that all items are available according to your order. After that, you have to set up your machine. To set it up, you will need a desktop computer or smartphone and stable internet. Once the setup is done, you can create unique craft projects with your friends and family.
Question 2: How to Make Stickers With Cricut?
Answer: Follow the easy steps below to make stickers with Cricut:
- First, you need to create your image file.
- Upload the image to the Design Space app.
- After that, print your image.
- Next, set up the material you want to use.
- Then, insert the cutting mat.
- Now, you have to cut the stickers.
- Lastly, take off the mat and remove the sticker.
Question 3: Which Machine Is Better, Cricut Maker 3 or Cricut Explore 3?
Answer: The Cricut Maker 3 and Explore 3 are Cricut's two latest die-cutting machines; each can cut, draw, engrave, and emboss different types of materials ranging from leather to card, vinyl to balsa wood. The main difference between the Cricut Maker 3 and Cricut Explore 3 is the tools and materials each cutting machine supports. The Explore 3 machine has 6 tools, while the Maker 3 machine has 13 accessories.
Question 4: How to Use Infusible Ink by Cricut?
Answer: Create designs in the Design Space app. Insert the infusible ink sheet onto the mat, and use the machine to cut it. After that, weed out the design. Now, apply the infusible ink design to your blank area, and apply heat with the Cricut EasyPress machine.
Question 5: Can Cricut Explore 3 Cut Wood?
Answer: Cricut says Explore 3 machine cuts more than 100+ different types of materials. Look at the materials, including paper, vinyl, cardboard, iron-on (HTV), fabric, leather, and even sturdy materials like wood, as long as it's thicker than 2 mm.